 Dartmole
Native traffic
With the plugin, Dartmole shows what your Dart code sends. Part of your app's
traffic never passes through Dart, though: a login through flutter_appauth,
Firebase, a WebView, a video stream. This page explains why, and sets up a
phone or simulator so Dartmole sees that traffic too.
The same setup works without the plugin, for apps that don't use it.
Why Dart is different
A Flutter app has two ways onto the network, and they don't share settings.
Dart's HttpClient, from dart:io, carries Dio, package:http's
IOClient, Image.network and most packages on pub.dev. It is part of
the Dart runtime inside the Flutter engine. It opens its own sockets and does
its own TLS, with a copy of BoringSSL compiled into the engine. It does not
run on top of iOS's URLSession or Android's networking. Two things follow:
- It ignores the proxy in the device's Wi-Fi settings. A phone set to send its traffic through a proxy still sends Dart's requests straight to the server.
- It has its own rules for which certificates to trust. On Android it trusts the authorities that come with the system and never one you install yourself.
That is why dartmole_plugin exists. It gives Dart's HttpClient the proxy
and Dartmole's certificate authority directly, so nothing on the device has
to change.
The operating system's networking carries everything else. Plugins with
native code (Swift or Objective-C on iOS, Kotlin or Java on Android) often
make their requests in that native code, with URLSession, OkHttp,
HttpURLConnection or Cronet. Those requests follow the device's proxy
setting and its certificate store, and the plugin's HttpClient never sees
them. Some examples:
| Package | What goes native |
|---|---|
flutter_appauth |
AppAuth for iOS and Android exchanges the code for tokens and refreshes them. The login page itself opens in the system browser. |
Firebase (firebase_auth, cloud_firestore, firebase_messaging, …) |
All of it: the Firebase SDKs do the networking. |
google_sign_in |
The Google Sign-In SDKs. |
webview_flutter, flutter_inappwebview |
Everything the page loads. |
video_player |
Streams, through AVPlayer and ExoPlayer. |
cupertino_http, cronet_http, native_dio_adapter |
Your own Dart calls, handed to URLSession or Cronet. |
| Payment, analytics and crash-reporting SDKs | Whatever their native part sends. |
If a call you expect is missing from the Proxy tab and your Dart code doesn't make it, it is probably native.
What you set up
Two settings on the device:
- The Wi-Fi proxy points at your Mac, on Dartmole's proxy port (8080 unless you changed it in Settings → Proxy).
- Dartmole's certificate authority is installed and trusted, so the device accepts the certificates Dartmole presents when it opens up HTTPS. Every Dartmole makes its own authority the first time it runs, so it belongs to your Mac alone. On the device it is called mitmproxy, after the proxy inside Dartmole.
Warning
Both settings apply to the whole device, not just your app. While the certificate is installed, every app on the device trusts your Dartmole. While the proxy is set, the device has no web whenever Dartmole isn't running. Undo both when you are done: see When you are done.
Without the plugin, this setup is all there is. Dartmole then shows the device's native traffic, its browser, and any app written in Swift or Kotlin. Your app's Dart calls still ignore the proxy, so for those you need the plugin.
1. Get the certificate
The Devices tab in Dartmole has a Native traffic section with two ways to get the certificate:
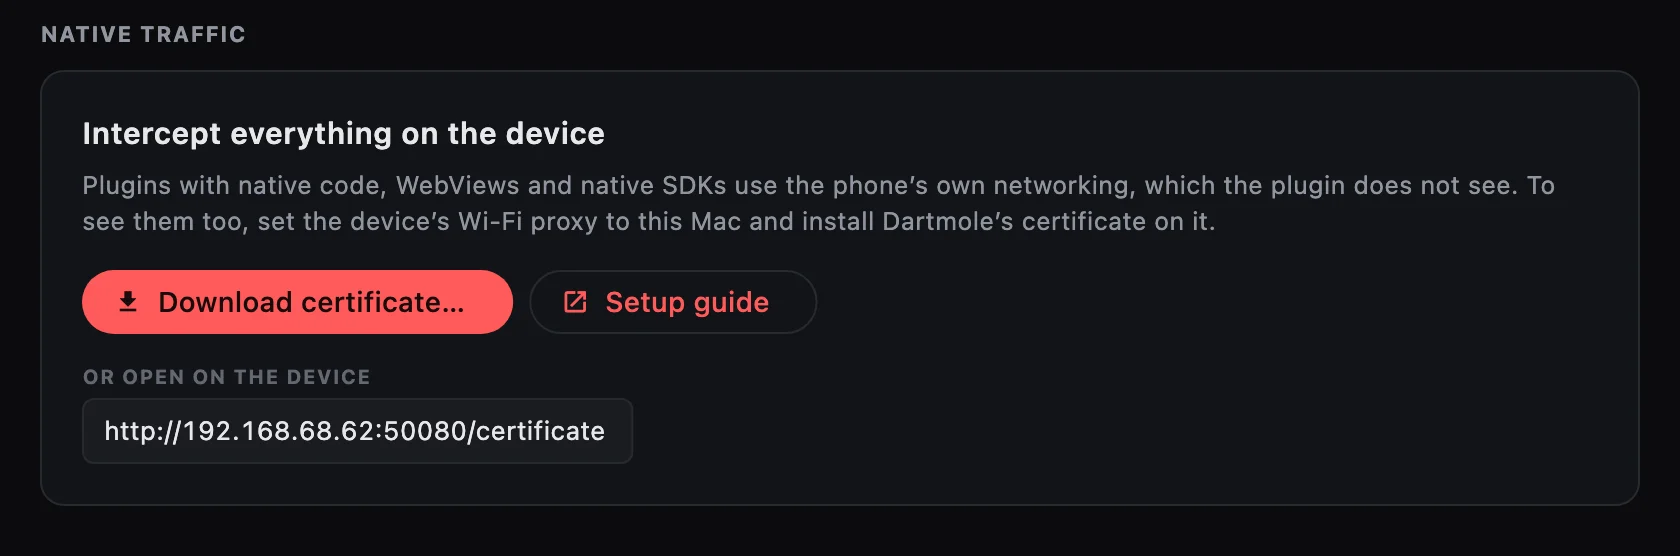
- On the device, open the address it shows,
http://<your Mac's address>:50080/certificate, in the browser. Dartmole serves a page there with the certificate and short steps for iOS and Android, written so you can hand it to a tester. With the plugin, the pairing panel's Also intercept native traffic opens the same page. - On the Mac, choose Download certificate…. Dartmole saves
dartmole-ca.crtand shows it in Finder. AirDrop it to an iPhone, or drag it onto a simulator or emulator. Settings → Proxy has the same button, next to the certificate authority.
Then follow the section for your device.
2. iPhone and iPad
- Open the certificate page in Safari and tap Download the
certificate, or AirDrop
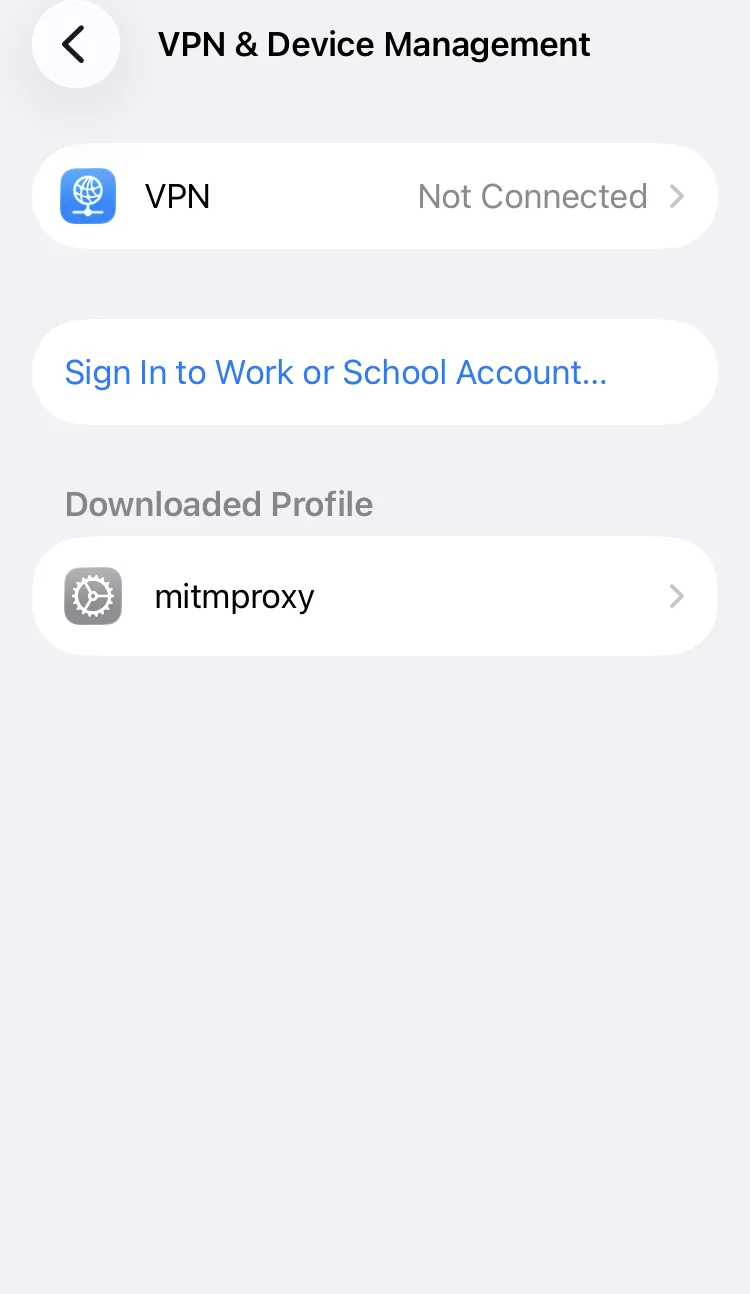
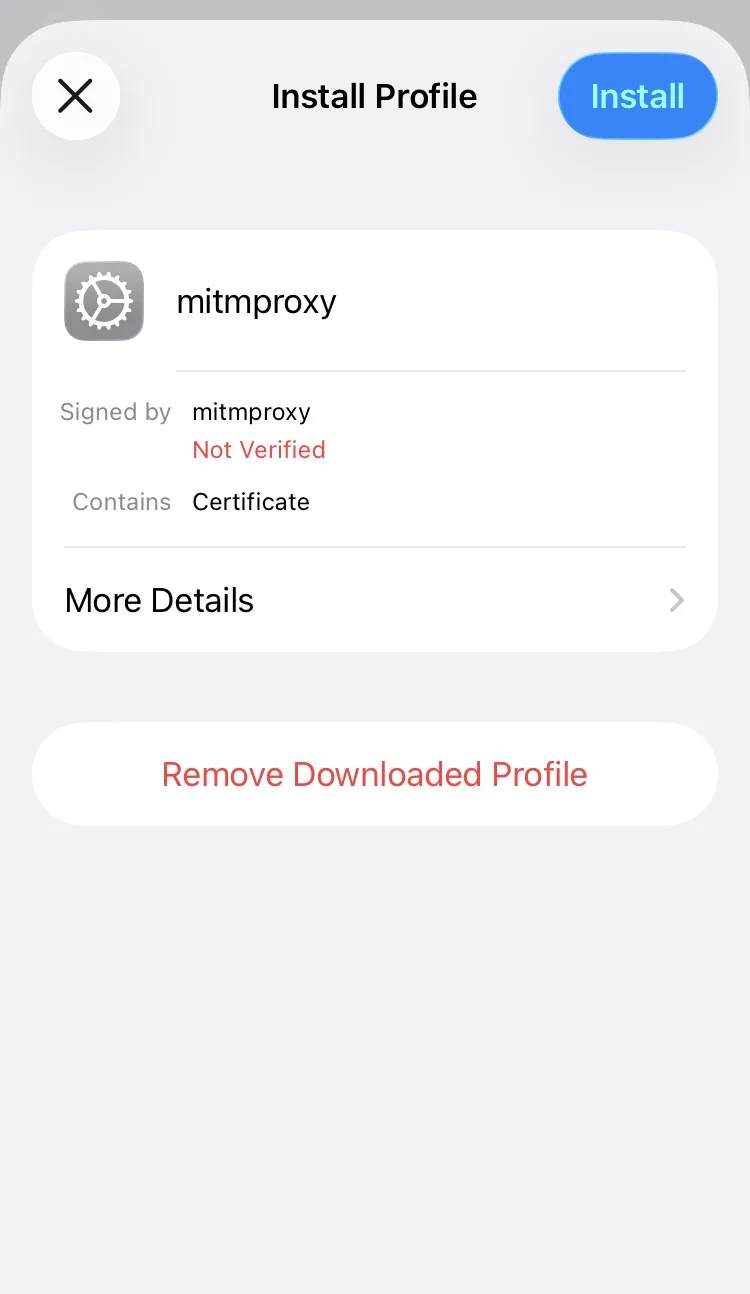
dartmole-ca.crtto the phone and open it. Tap Allow if Safari asks about a configuration profile. iOS then says Profile Downloaded. - Open Settings → General → VPN & Device Management and tap mitmproxy under Downloaded Profile. Tap Install, enter your passcode, and tap Install again on the warning that follows.
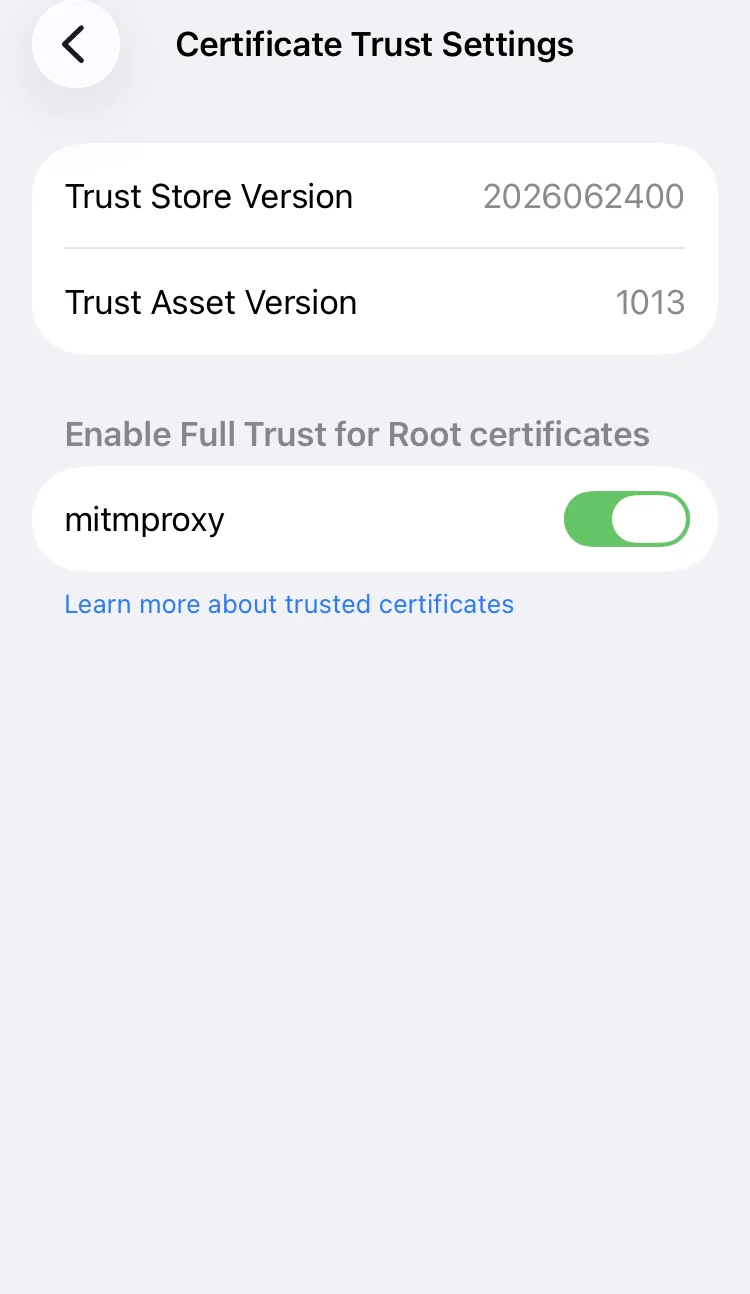
- Open Settings → General → About → Certificate Trust Settings and turn on mitmproxy. Don't skip this one: without it, iOS installs the certificate and trusts nothing it signed. The warning in step 2 says as much.
- Open Settings → Wi-Fi, tap ⓘ next to your network, then Configure Proxy → Manual. Set Server to your Mac's address and Port to the proxy port, both on Dartmole's Devices tab under Host and Proxy. Leave Authentication off and tap Save.
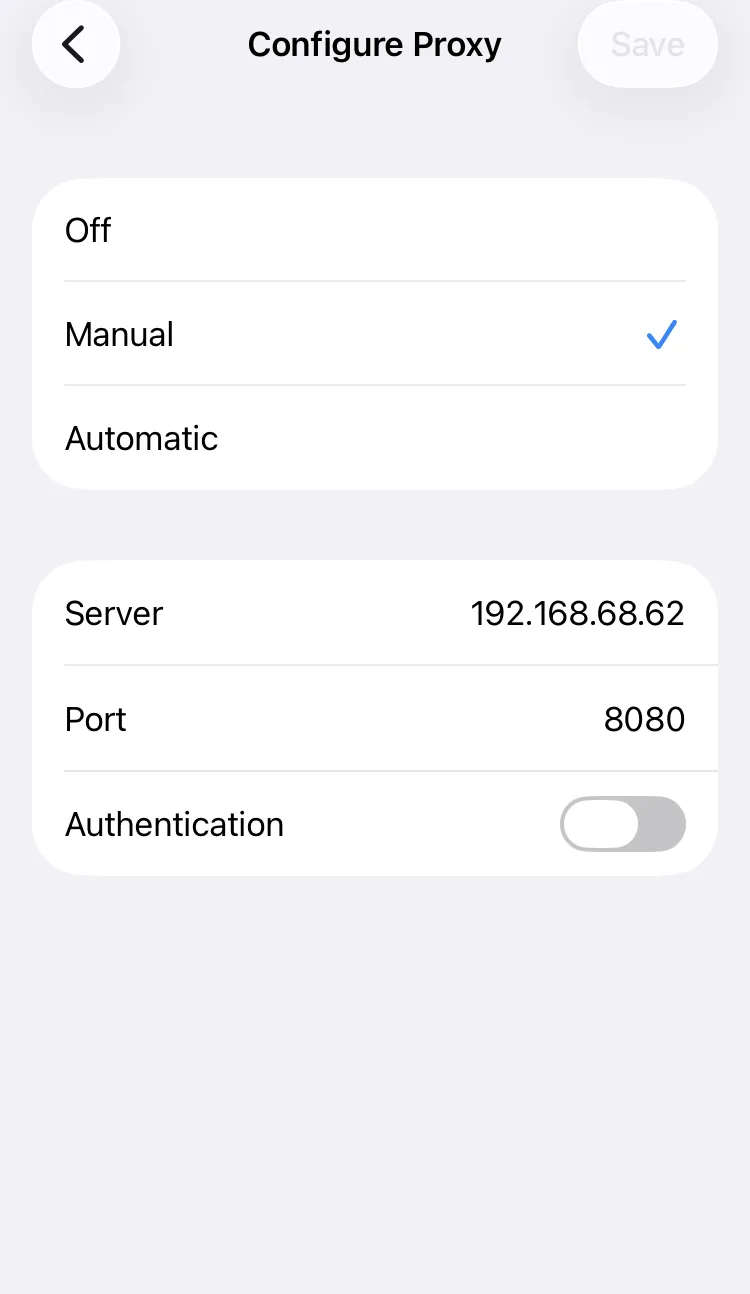
There is nothing to change in your app: on iOS, a certificate you install and trust applies to every app.
3. iOS Simulator
The Simulator has no Wi-Fi settings. It uses your Mac's network, including the Mac's proxy setting.
-
Trust the certificate in the booted simulator:
Shellxcrun simctl keychain booted add-root-cert ~/Downloads/dartmole-ca.crtThat installs and fully trusts it in one go. Dragging the file onto the Simulator window works too; then finish with steps 2 and 3 for iPhone.
-
Point your Mac's proxy at Dartmole. In System Settings → Network, choose your connection, then Details… → Proxies. Turn on Web proxy (HTTP) and Secure web proxy (HTTPS), each with server
127.0.0.1and port8080. Or, for Wi-Fi, in Terminal:Shellnetworksetup -setwebproxy Wi-Fi 127.0.0.1 8080 networksetup -setsecurewebproxy Wi-Fi 127.0.0.1 8080
This sends your Mac's own traffic through Dartmole as well. HTTPS in your Mac's apps fails while it is on, because the Mac doesn't trust Dartmole's certificate, and Dartmole's Proxy tab fills up with your Mac's traffic. Switch it off as soon as you are done.
4. Android
First, the build. Since Android 7, an app ignores certificates the user installs unless its network security config says otherwise. Without this, the device trusts Dartmole's certificate and your app's native code still refuses it. Opt in for debug and profile builds only, so release builds keep trusting the system's authorities alone.
In android/app/src/debug/res/xml/network_security_config.xml, and the same
file in src/profile:
<?xml version="1.0" encoding="utf-8"?>
<network-security-config>
    <base-config>
        <trust-anchors>
            <certificates src="system" />
            <certificates src="user" />
        </trust-anchors>
    </base-config>
</network-security-config>
In android/app/src/debug/AndroidManifest.xml, and the same in
src/profile:
<manifest xmlns:android="http://schemas.android.com/apk/res/android">
    <application android:networkSecurityConfig="@xml/network_security_config"/>
</manifest>
Use base-config rather than debug-overrides: profile builds aren't
debuggable, and Android ignores debug-overrides in them. With the plugin,
the pairing panel checks this for you. In a build that doesn't opt in, it
says so and doesn't offer Also intercept native traffic.
Then, the device. The menu names below are Pixel's; other phones put them in a slightly different place, and searching Settings finds them.
- Open the certificate page in Chrome and tap Download the
certificate, or copy
dartmole-ca.crtto the phone's Downloads. - Search Settings for CA certificate. On a Pixel it is under Security &
privacy → More security & privacy → Encryption & credentials → Install a
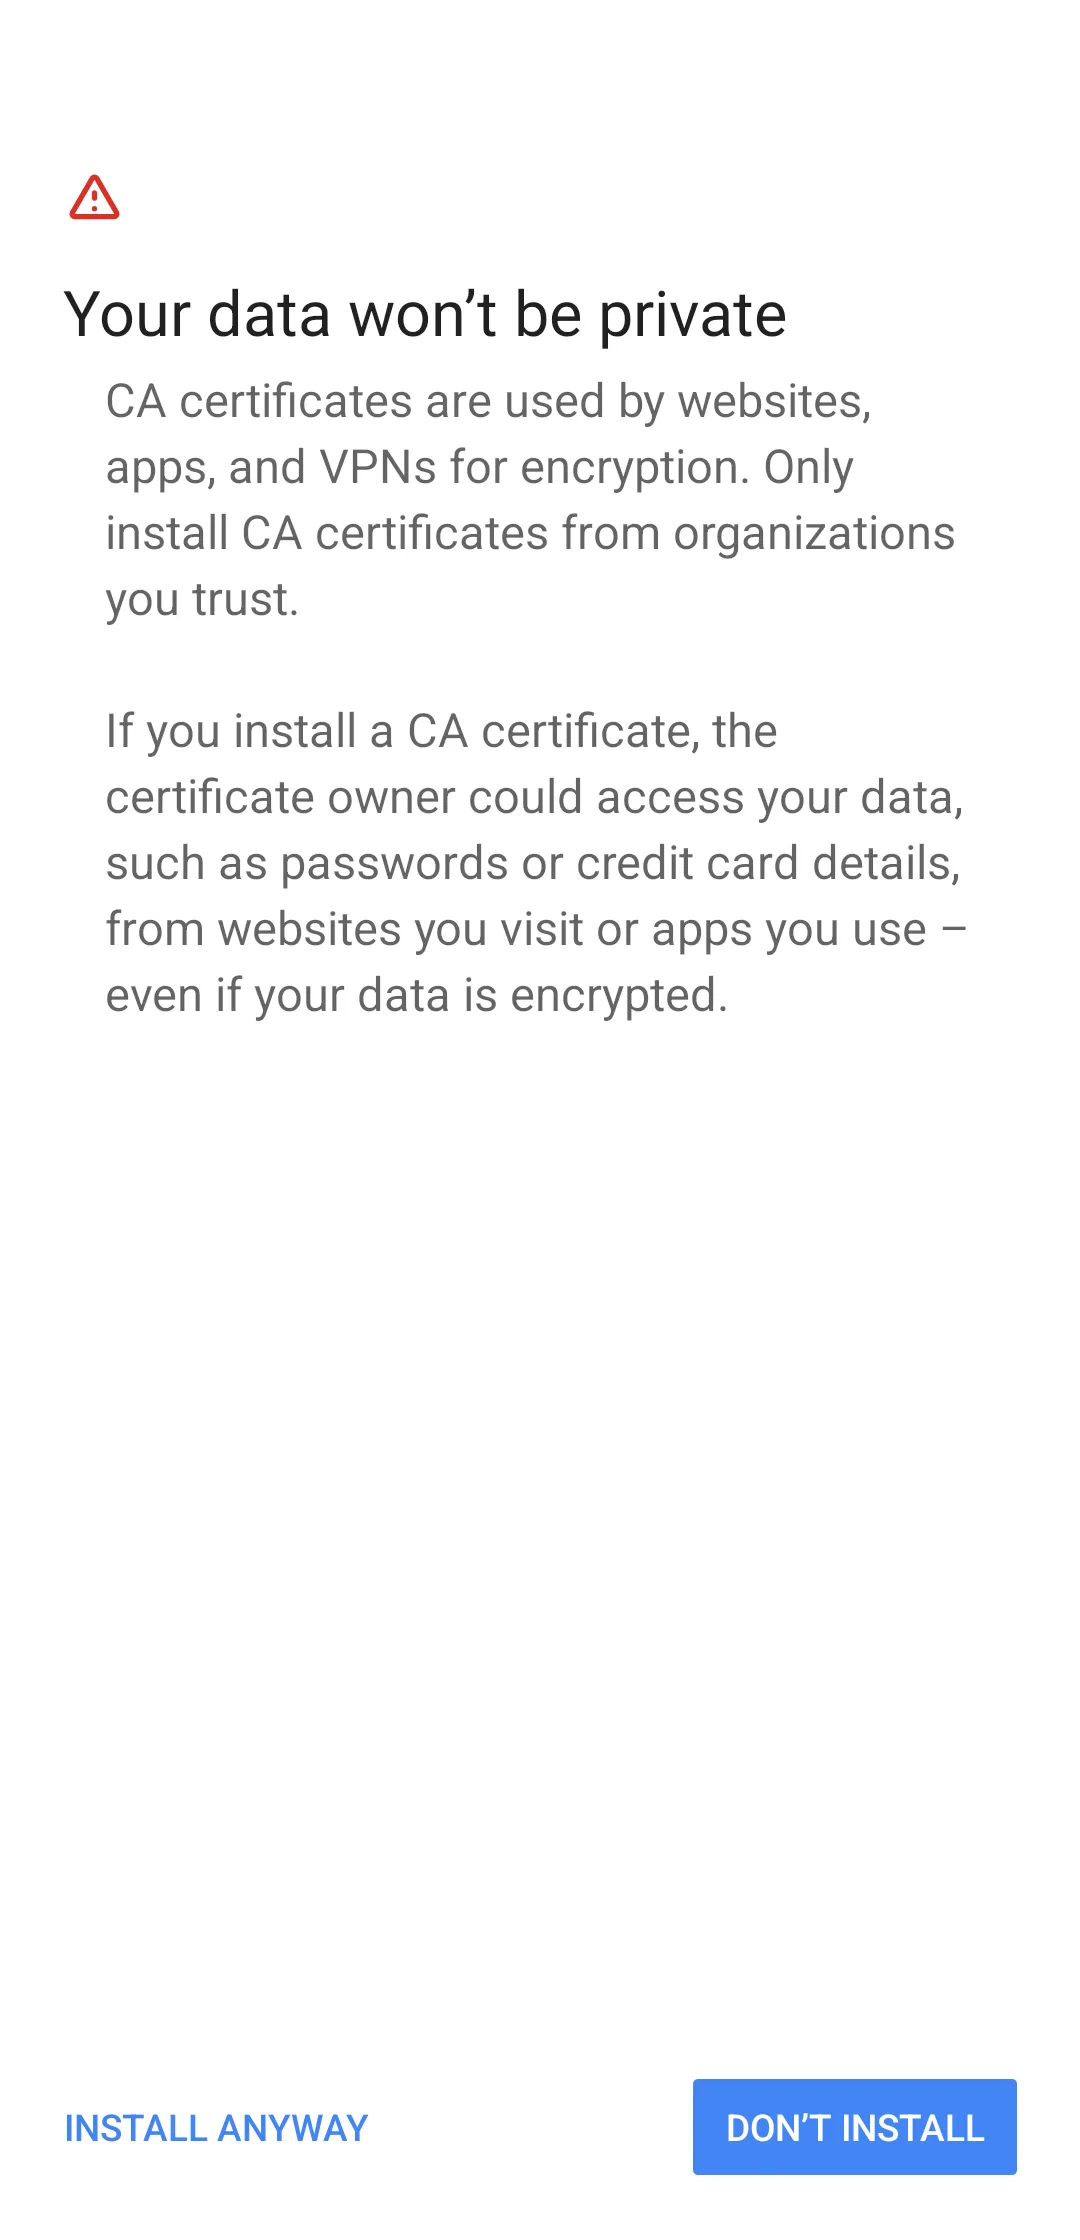
certificate → CA certificate. Android warns that your data won't be
private; choose Install anyway, confirm with your PIN, and pick
dartmole-ca.crt. Android only installs certificates on a phone with a screen lock, so it asks you to set one if there is none. - Open Settings → Network & internet → Internet, tap the gear next to your Wi-Fi network, then the pencil. Under Advanced options, set Proxy to Manual, with your Mac's address as Proxy hostname and the proxy port as Proxy port. Tap Save.
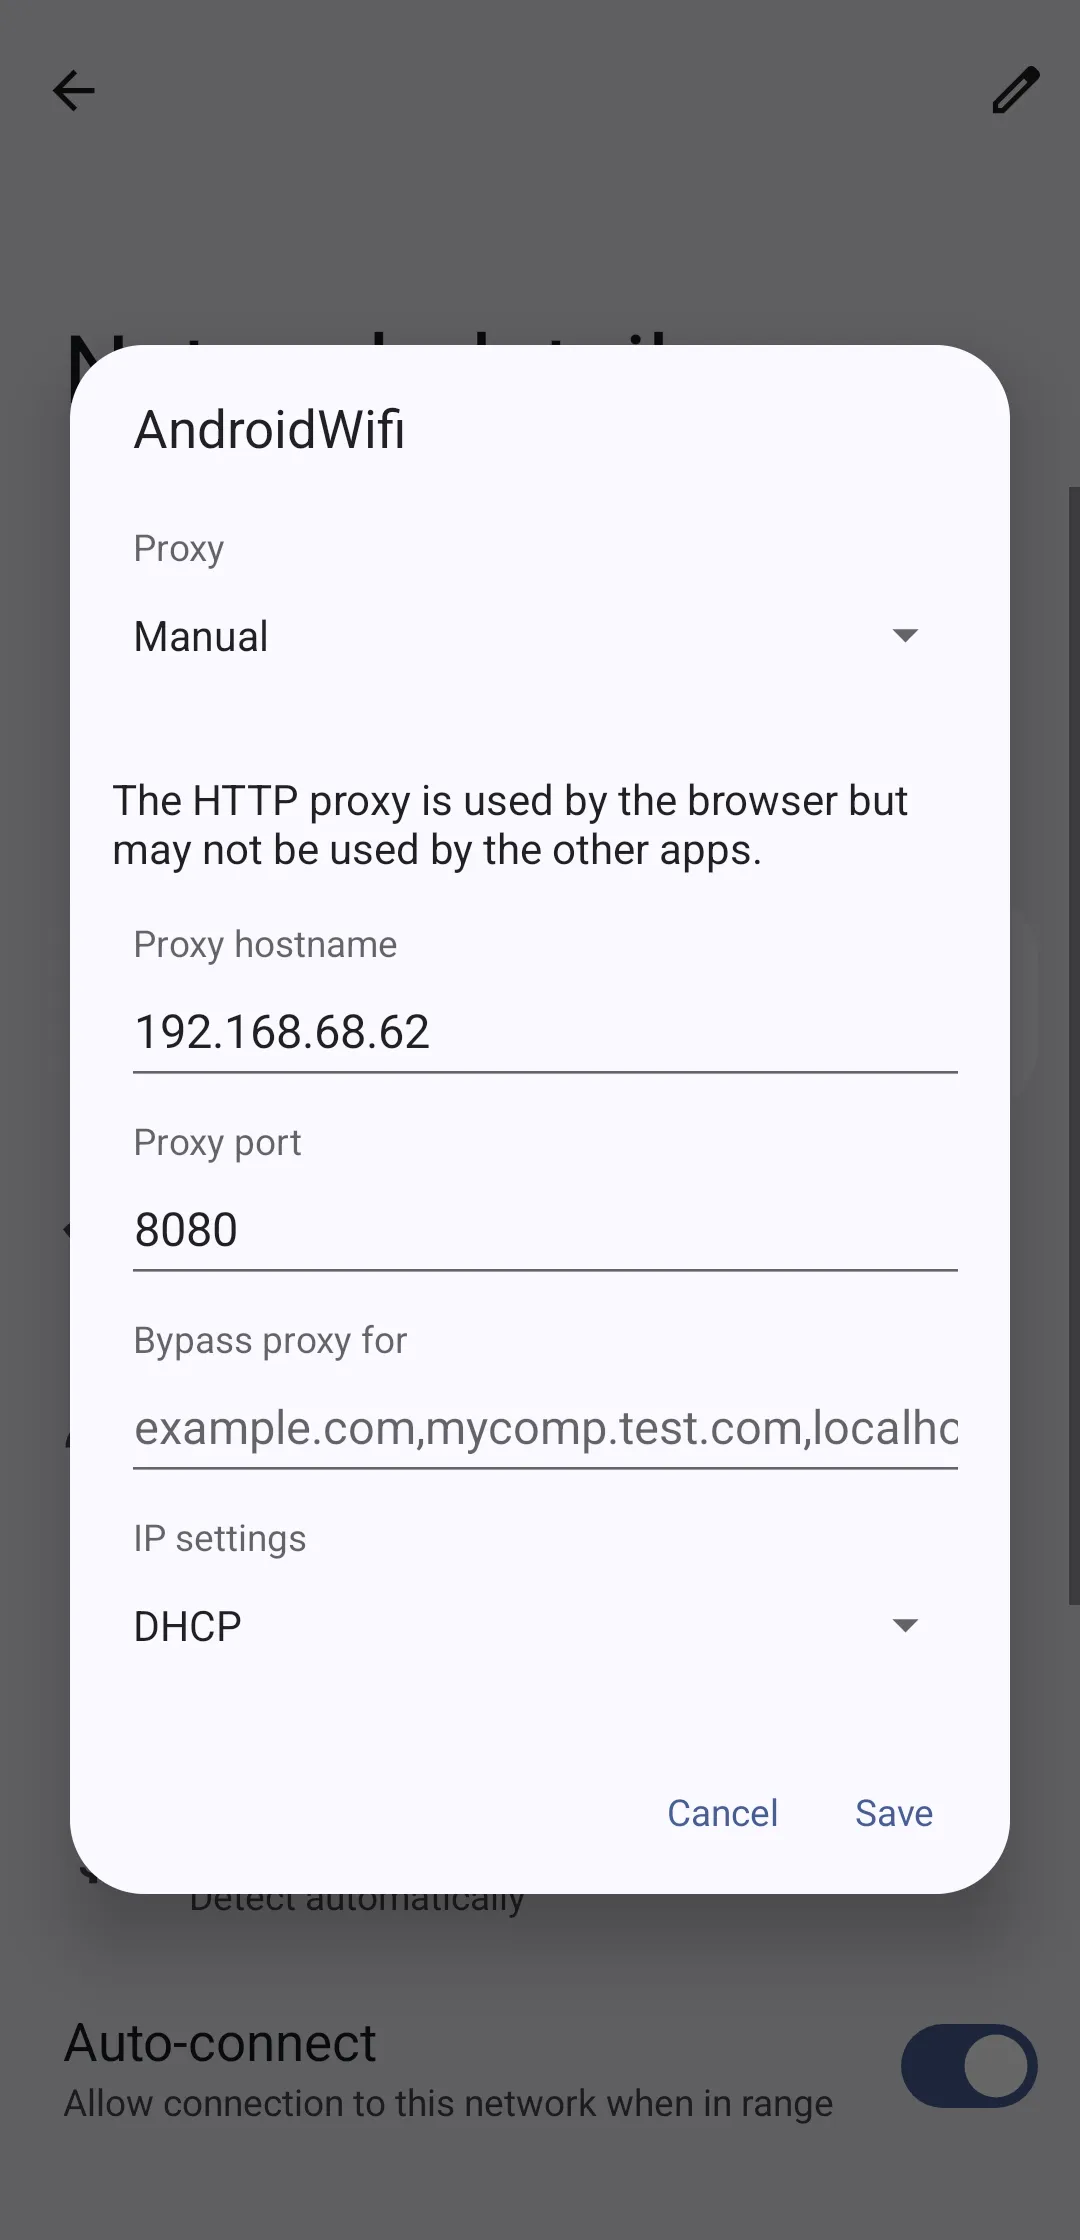
Android notes under the proxy setting that other apps "may not" use it. Apps
built on Android's own networking do; Dart's HttpClient is one that
doesn't, as above.
Over a USB cable you can skip the network between the phone and the Mac: run
adb reverse tcp:8080 tcp:8080, and use 127.0.0.1 as the proxy hostname.
5. Android emulator
-
Copy the certificate onto the emulator. Drag
dartmole-ca.crtonto its window, or:Shelladb push ~/Downloads/dartmole-ca.crt /sdcard/Download/Then install it as in step 2 for Android.
-
Set the proxy. The emulator reaches your Mac at
10.0.2.2:Shelladb shell settings put global http_proxy 10.0.2.2:8080Setting the emulator's Wi-Fi proxy as in step 3 for Android works too, with
10.0.2.2as the hostname.
The build needs the network security config from step 4 here too.
Check that it works
Open https://dartmole.invalid/check in the device's browser. That address
doesn't exist on the internet; only Dartmole's proxy answers it, with a line
like this:
{"dartmole": {"machineId": "…"}}- The page loads with that line: the proxy and the certificate both work. Open your app; its native calls appear on the Proxy tab.
- The browser says it can't find the server: the request didn't reach Dartmole. Check the proxy setting, and that Dartmole is running.
- The browser warns that the connection isn't private: the request reached Dartmole, but the device doesn't trust the certificate. On iOS, check Certificate Trust Settings.
On Android, the browser trusts certificates you install whatever your app's config says. If the check page works and your app's native calls still fail, look at the network security config.
When you are done
- Set the proxy back to Off. iPhone: Settings → Wi-Fi → ⓘ → Configure
Proxy → Off. Android: the same Wi-Fi settings, Proxy → None.
Emulator:
adb shell settings put global http_proxy :0. Mac, for the Simulator: turn off both proxies in System Settings, ornetworksetup -setwebproxystate Wi-Fi offandnetworksetup -setsecurewebproxystate Wi-Fi off. - Remove the certificate. iPhone: Settings → General → VPN & Device
Management, the mitmproxy profile, Remove Profile. Android:
Encryption & credentials → User credentials, then mitmproxy, then
Remove. Simulator:
xcrun simctl keychain booted reset, which removes every certificate you added to it.
When it doesn't work
- One SDK refuses to connect while everything else works. It pins its server's certificate, so it rejects any other one, Dartmole's included, on purpose. Turn the proxy off to use it.
- The certificate is installed, and HTTPS still fails on iPhone. Turn on full trust in Certificate Trust Settings (step 3 for iPhone).
- The browser works on Android, your app's native calls don't. The build doesn't opt in to user certificates. See step 4.
- Nothing reaches Dartmole. Your Mac's address may have changed since you set the proxy; compare it with the Devices tab. A changed proxy port in Settings needs changing on the device too. If the phone can't load the certificate page either, the network keeps the phone and the Mac apart: see When nothing shows up.
- Your Dart calls are missing. They ignore the device's proxy. Route them through the plugin, as in Getting started.